If I asked you to think of an alcoholic beverage, you would likely think of beer, wine, or some type distilled spirit. Hard ciders or sake normally follow closely behind. However, in the re-release of The Elder Scrolls V: Skyrim, you’ll encounter another type of fermented brew: mead. Though its stablemates overshadow it these days, mead is arguably the oldest type of fermented beverage. It’s incredibly simple to make, and has a history that spans the globe.
It hasn’t always been that way. Aside from its use in period pieces, Mead is actually having a bit of a resurgence in the craft brewing world of the United States. If you’ve ever been curious about it, we’ll be diving into the characteristics, history, and even how to make some of your own!
The Basics
Mead is diluted and fermented honey, and known by some simply as honey wine. The flavor profile of a honey-only mead can be like a white wine with a comparable Alcohol By Volume (ABV) of 6-20%. Also like wine, the biggest investment you need to make in the production of mead is time. Most meads are aged for a year or more. However, unlike grape wine where only one ingredient is used, mead is most commonly made with additional ingredients to produce a variety of styles more similar to beer; there are dozens of varieties of mead. The most popular varieties for home brewers are melomels, or mead made with fruit, and braggots, half-mead and half-beer hybrids. These hybrid meads are very true to mead’s long tradition, and bring the best aspects of all the ingredients to the glass.
The discovery of mead is attributed to an accident, much like most other types of fermented beverage. It’s theorized that a bee colony might have slipped a tree hollow, filled with rainwater, and been fermented by wild yeast. Regardless of the veracity of the theory, there is evidence of intentional fermentation going back to 7000 BC in China. Mead was heavily consumed throughout the ancient world, with many of the most famous people from history counted among them.
Within Europe, it was not uncommon for monks to make and distribute mead. As grape wine had a religious meaning, mead never had the same level of popularity within the Church. Still, beeswax candles also had a purpose within the Church. During the collection of the beeswax, monks would be left with watered down honey—the perfect mead primer.
The Case for Mead in the North
Given the relative obscurity of mead these days, many people think of it as a drink consumed by the Norse. Bees are very hearty creatures present in many climates that don’t support grain or wine, particularly before modern times. Honey’s inherent resistance to spoilage makes it easier to transport than grapes, so it makes sense that the rugged climate of Scandinavia would have more mead than beer or wine.
On that last point, it is believed that raiding parties would head south and pick up grain, fruits, and other fermentables which would be brought back home. Once home, they would eat some of it. But, any extra would be mixed with harvested honey and fermented into mead. As such, the mead would vary greatly from year to year, a tradition that homebrewers embrace today—even if they do so unwittingly.
Many cultures at the time thought alcohol to be a gift from the gods. With a modern understanding of fermentation, it’s easy to forget that strong, reliable yeast is a new concept relative to brewing. The quality or presence of wild yeast varied greatly. Families considered the tools used to create the brews family heirlooms. Yeast spores on the heirlooms likely helped keep consistent and strong meads between generations.
Mead Today
With the advent of germ theory and microbiology, mead has benefited in much the same way that beer and wine have. Consistent yeast cultures that are hearty and fast-working alongside good sanitization practices lower the odds of undrinkable meads or infections. Novice brewers find a wealth of information online to produce unique and tasty beverages at home. You likely have a local brew store nearby as well!
Another huge benefit today is the availability of honey, fruits, herbs, and spices available year round. Unlike in days of old, brewers don’t need to only use local ingredients or those brought back from raids. Those with the means of using either are heavily encouraged. Given my location in the middle of a desert, I am grateful for the expansion of available produce. For example, I have an agave-dragonfruit mead with guava fermenting.
Making Mead Yourself
Who doesn’t love practical applications that involve alcohol? First, though, we must mention the question of legality. It should go without saying, but check your local laws before brewing. From my (brief) research, all of Australia, New Zealand, and the UK are allowed to ferment beverages without a license—for personal use only. However, only certain provinces in Canada allow for home brewing. In the United States, Federal and State Governments allow for home brewing, but one local government in Alaska currently forbids it.
Mead can be incredibly simple with just three base ingredients: water, honey, and yeast. Unfortunately, honey isn’t very nutritious by itself, either to humans or yeast cells. Yeast need vitamins and minerals much like you or me. Accordingly, you’ll want to include something else to bring those to the table. The ancient technique is to add fruit or grains as we discussed, but modern nutrient blends like Fermaid K and DAP allow for exclusively honey meads that ferment well. Do note that you can, and often should, add nutrient blends to hybrid meads as well. It just isn’t as imperative as with pure honey.
With that out of the way, let’s make some mead. This is going to be loosely based off a popular beginner’s mead named JOAM.
Equipment
For equipment, you need a place to mix water, yeast, and honey. Glass or food-grade plastic works best. Depending on the variety, you can use only one container, like a plastic gallon milk jug or a tinted glass growler. Unlike with beer, you do not need a kettle to heat the mixture unless you’re making a braggot, bochet, or some metheglins. You’ll also want an airlock. If you’re using one of the more improvised containers like a gallon milk jug, a rubber balloon that fits over the mouth of the jug will suffice. Simply prick a small hole with pin or knife at the furthest point from the balloon’s mouth, and you have a basic airlock.
Pick up some sanitizer and a squirt bottle. I recommend picking up Star San. It’s easy to mix up, inexpensive, edible, and effective. You can also use sanitizer on liquid-style airlocks. Even with very liberal application, a little sanitizer container will go a long way. Lastly, a small cup or container to rehydrate the yeast before pitching is a good idea.
Consumables
As mentioned previously, the basic ingredients are honey, yeast, and water. Breaking them down: I recommend picking up the cheapest honey you find for your first batch. If something goes wrong, you will thank me for not wasting expensive honey. If it goes as planned, you will still enjoy the mead. Plan on roughly 3 pounds per gallon.
Bread yeast from your local market is cheap and effective and will suffice for your first mead. If you have a brew store nearby, I cannot recommend Lavlin EC-1118 more highly. One standard-sized packet will easily ferment a five-gallon carboy in my experience. As for water, I recommend working with what you’ve got. If you know that you have heavily treated water or especially hard water, you can certainly filter it. Otherwise, I wouldn’t worry too much.
Nutrients are incredibly important and not to be forgotten. If you’re already stopping by a brew store, pick up some Fermaid K and Di-ammonium Phosphate (DAP) if available. If you’re just popping down to the local supermarket, grab some raisins. A small 1 1/2 oz box will do nicely. Though not perfect or even ideal, raisins have made thousands more meads than I.
Making the Must
Now that you gathered the supplies, it’s time for the most important step of all: cleaning. Modern yeast is strong, honey is naturally resistant to outside contaminants, and you’ll likely end up with something higher proof than most microscope critters can survive. However, there is still plenty of opportunity for infection to set in. Soap, water, and a brush will get rid of most everything. Rinse well, and then spray with Star San diluted according to the label.
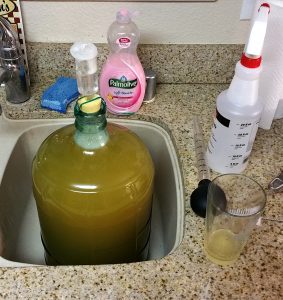
Now, we’ll rehydrate our yeast. If you’re using Lavlin, the instructions are provided on the packet. Otherwise, put about 3 oz warm (but not hot) water in your small sanitized pitching cup. Pour the yeast in the water and stir with a sanitized spoon for about a minute. Toss in a raisin or two to give the awaken yeast something to eat. If you’re using Fermaid K, add about a teaspoon instead. Leave this to do its thing for a few minutes. Meanwhile, pour some warm water in the carboy or jug. About halfway will work great. Pour your honey into the warm water. Swirl the jug until the honey dissolves, or at least as best as you can.

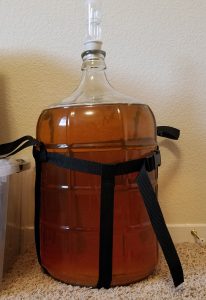
A melomel in its secondary 5 gallon carboy. Note the straps for easier moving and airlock, with plenty of headspace.
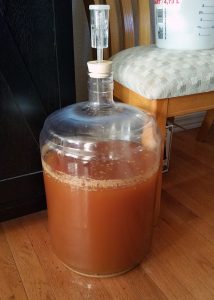
Dump the rest of the raisins in the jug. Nutrient users: add about a tablespoon of Fermaid K and a teaspoon of DAP. Grab the rehydrated yeast and pour it into the jug; with any luck it will already be bubbling away. Fill the rest of the jug with water, leaving a couple inches at the top for foaming. Given that all the nutrients and sugar are present at the beginning, you’re going to see a big boom of activity in anywhere from 12-48 hours. This headspace will help prevent a sugary, sticky mess ejecting out of your airlock.
And Now, We Wait
Slap an airlock on the mouth, and put it in a cool dark place. A dark place is particularly important if you don’t have a tinted container. Mead oxidizes in light and gives off flavors; this is not something I normally recommend.
Now, pretend like it doesn’t exist for a few weeks. This is the hardest part for me. Particularly, I find it difficult on the first batch. Mead takes a significant amount of time to age and there is little you can do to accelerate it. However, every time you open the jug, there is a chance you can contaminate it. After a few weeks of fermenting, the mead should start to settle down. A thin layer of rather unattractive dead yeast forms called the lees.
After three or four months, you should have a clear mead atop the lees. Ideally, you’ll want something to siphon the clear mead without disturbing the lees. It’s not imperative. I drank plenty of meads that are still a little cloudy. Still, it will make for some better mead. You can drink smaller quantities straight from the jug. Do try to drink it all in relatively short order after opening it. Once fermentation stops, the yeast lose their ability to produce CO2 and are more vulnerable to infection and oxidation. Accordingly, you are better off bottling or kegging larger quantities after a few months.
Improving and Improvising
There is the possibility that you won’t like it, which is a big reason I recommend doing a smaller batch the first time. That’s not to say you don’t like mead! There are dozens of varieties to try. Mulling spices added make for a wintery treat. Hops will add a bitter contrast to the sweetness while complimenting the floral notes. Meanwhile, apple cider makes an amazing hybrid. Add whole fruit, imbuing new flavors. Don’t be afraid to experiment and try new combinations. If ever you have a question or a doubt, there are dozens of homebrewing communities online that can help.
Most of all, enjoy partaking in a tradition that spans the globe and all of human history. Or at the very least, have a better understanding of what they’re drinking in Tamriel.


