(Author’s note: Initially this was intended as a single guide. After churning out a wall of text, however, I decided to break it down into multiple parts. Part one discussed what planetary interaction actually is and how to prepare a character for it. Part two will detail actually setting up your initial PI planet. Part three will cover transferring PI materials to other planets for further refinement, and other final and miscellaneous details. This is part two.)
In a previous article, I already detailed the types of training and homework involved to start making money through planetary interaction (PI). This article will show you how to properly set up a planet in order to create PI commodities.
The Ingredients List
The basic summary of extracting materials from a planet is actually rather simple. A single command center is placed on single planet. This command center outputs a set amount of power and CPU, which determines the number of structures you can have on that planet to extract and process planetary commodities. Upgrading the level of the command center increases the amount of CPU and power that is output on a given planet, thereby allowing for more structures to be placed on said planet.
The other structures for planets are:
- Extractor Control Unit: this is the building that pulls resources out of the planet.
- Storage Facility: stores resources, remarkably uncomplicated..
- Launchpad: sends resources to a planet’s Player-Owned Customs Office (POCO).
- Basic, Advanced, and High-Tech Processors: these buildings turn lesser tier materials into higher tier materials.
- Planetary Links: these connect structures together and allow for the transfer of resources between them.
These structures are what ultimately get you resources from planets. Working in concert they will extract, process, and launch PI materials for you to sell for fun and profit.
Setting the Stage and Building Your Colony
Since you followed my earlier guide and have done a good deal of homework, you already have a system in mind with the appropriate planets you need. The following steps will walk you through setting up your first planet and extracting your first materials, setting the stage to set up the rest of of your PI empire.
Step 1: Go to the nearest market hub and purchase the appropriate command centers. This step is fairly self explanatory. If you wanted to extract heavy metals from a lava planet, for example, you will need a Lava Command Center. For the purposes of this guide, properly completing a single P2 chain will require three command centers total: two for planets that will extract a P0 material and process it into a PI material, and one that will process those PI materials into P2 materials.
An example configuration for consumer electronics could include one Lava Command Center (for non-CS crystals), one Ice Command Center (for heavy metals), and one Temperate Command Center (for P2 processing). For my own setup, I typically have systems with four planets extracting P0 materials, processing them into P1 materials, and then a fifth planet that turns everything into P2 materials.
Step 2: Bring your command centers to the selected system and place them on the appropriate planets. Command centers are 1000 m3 per pop, so you’ll need an industrial or something beefy to haul them around.
There is one final criterion I did not mention before for selecting an appropriate PI system that I should mention immediately: your system should probably have a station in it. If your system does not have a station, do not panic; it’ll just make transporting PI materials a little bit more cumbersome if you’re in low-sec or null-sec.
Once in system, I select an overview tab or setting that allows you to view planets, sorting all the items by type. Select the planet you want to place a command center on, and in your selected item window the third button from the left should read “View in Planet Mode.” Go ahead and click on that. Your screen should change to something that looks a little like this:
A lava planet with PI commands in the upper left.
Using the “Build” tab, select command centers. A little round button will appear as your mouse cursor. Go ahead and dump the command center anywhere on the planet (it doesn’t matter where). Confirm the dialog box with the “submit” button, and you now have a command center on your first planet.
Close the window. Repeat this for any applicable planet, and go dock up into a station. The rest of PI setup does not require you to be floating around as a vulnerable target in space.
Step 3: Upgrade your command center. On your Neocom, click on the “Science and Industry” button or use the default shortcut key of Alt-S. Select the “Planets” tab, and this will display a list of all planets you have a command center placed on. Double click the planet on which you wish to build structures.
This will bring up the default planet mode again. Find the command center you previously placed on the planet and click on it. Click on the “upgrade” button, and move the slider to upgrade the level of the command center as high as your skills allow. This will likely be on the order of several million ISK.
Click “Upgrade”, and click “submit” to confirm the change. You now have successfully upgraded the command center to level 5.

An example of an upgraded Command Center already in use.
Step 4: Set up the extractors on your planet in a suitable place. Click on the “Scan” button. An interface like so should appear: 
This allows you to view particular concentrations of resources on a given planet. Adjusting the sliders affects the sensitivities and visible concentrations of a selected resource. Eventually the planet will look covered with various white, red, yellow, green, and empty spots after appropriate adjustments.
Click back on the “Build” tab, click on “Extractor Control Units,” and select the appropriate unit. A circular “area of effect” will appear around the structure: this is the limit of the length your extractor heads for picking up resources. Place the structure near red concentrations of the resource you have scanned and click the “submit” button.

Now, click on your newly placed Extractor Control Unit and click on the “Survey for Deposits” button. This window will appear:

Select the resource you wish to extract, then select a blue circle underneath “Extractor Head Units.” This will place an extractor head on the planet. The “extraction area size” will determine how large of an extraction area the heads will extract from. The larger the area size, the longer the extraction cycle.
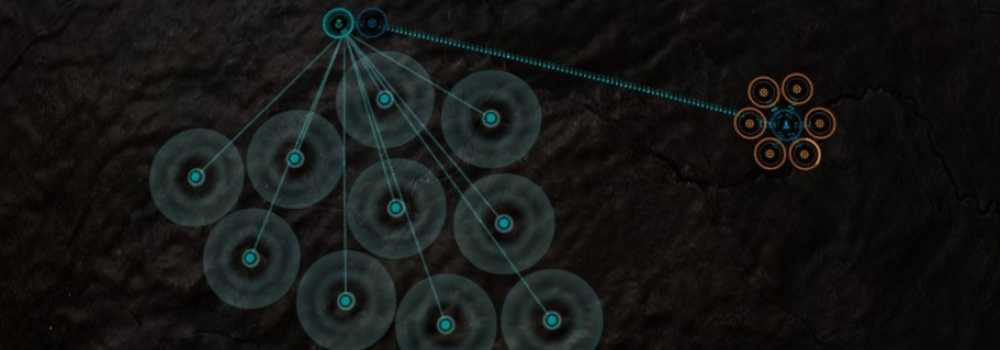
Place all ten extraction heads on the map, covering the densest areas possible without overlapping them. Your result will probably look something like this (albeit neater; people less geometrically challenged than me will have patterns that won’t leave empty spaces of red):

Hit the “install program” button, and then finally submit the changes.
Step 5: Set up the rest of the structures on your colony. If yields of a particular planetary commodity are high (as in null-sec), the next step in the process is to go to the build tab, select a Storage Facility, and plop it down right next to the Extractor Control Unit. Additionally, build a Launchpad (under “Spaceport”) near the Extractor Control Unit. Finally, build several “Basic Industry Facilities” right next to the Launchpad. You should also at this point set the schematic of the appropriate PI commodity at each of the Industry Facilities by clicking on the “build” facility and selecting the appropriate schematic.
These are now all the items you’ll need to turn a P0 material into a PI object.
Step 6: Prepare to spend the next several minutes furiously clicking to set up links, routes, and final details. Ctrl-clicking on a structure will spawn a planetary link, a little white line. Click on the structure you would like linked, hit the “submit” button, and presto, you have created a planetary link.
In the case of our small PI setup, you’ll want to link your Extractor Control Unit to your Storage Facility, your Storage Facility to your Launchpad, and your Launchpad individually to all your Basic Industry Facilities. Assuming your yields are high enough, you will also need to upgrade the route between the Extractor Control Unit and the Storage Facility, which is done by selecting the route and clicking on the appropriate upgrade button.
Once all your links are set up (always mind submitting the changes), create your routes. From the extractor, select the “Products” button and create a route of the products to your Storage Facility. Then click on the storage facility, click on the “Routes” button, and route the incoming product to every individual Basic Industry Facility. Finally, route the products from every Basic Industry Facility to your Launchpad.
Your final setup may look something along the lines of this:

Final Directions
Repeat Steps 3 through 6 for all applicable planets and all applicable PI commodities. Your final planet for processing P2 commodities will be set up a little bit differently, so hold off on that for the time being. I will be detailing how to set that up in the third and final part of this guide.
The bulk of the work is now done, and your resources are being extracted and processed without any further assistance until the extraction cycle is complete. Once a cycle is complete, restart the cycle and adjust your extractor heads if necessary. No further work is required to create PI commodities.
This article originally appeared on TheMittani.com, written by Drewson Houton.