With the Warzone event in full swing, Sleepers have appeared in normal space. The mysterious Quartermaster has asked for capsuler help in recovering some information from the wrecks that populate battlefields across New Eden. However, some fully armed and operational Sleeper ships prowl these sites. Surviving to find the information and returning for your reward in one piece requires some special ships. Today on the Drafting Table, we will explore a little bit about surviving the Warzone as well as diving deep into one ship, the Legion.
Welcome to The Warzone
The Warzone Extraction event tasks players with navigating a wreck-filled battlefield at the Warzone beacons visible in space. By physically bumping into the wrecks, you might dislodge a container with a Corrupted Trinary Relic, which can be turned into the Quartermaster sitting just outside the site to complete a task for The Agency. Be careful, as this bumping may also summon more Sleepers back to the battlefield. These Sleepers are similar to the ones found in wormholes, and they pack a lovely electronic warfare punch. Prepare to be webbed to almost a standstill, pointed, and heavily neuted.
The sites offer both intrinsic rewards, as well as some based out of The Agency platform. The sleepers in the sites drop a variety of unique boosters that improve various aspects of your ship. In addition, The Agency is offering two missions that reset 20h after completion. The first, worth 10 points, is to return a Corrupted Trinary Relic to the Quartermaster. The second, worth 20 points, is to kill 20 Sleepers. These points contribute to a running total, with some containers holding more Agency Boosters and Valkyrie Cerebral Accelerators as rewards.
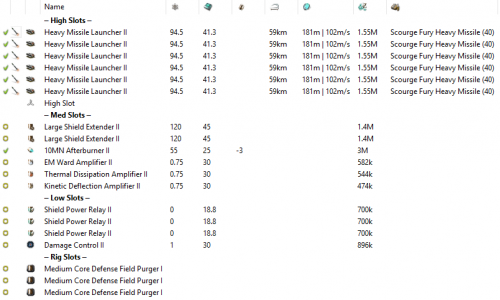
Given what you can expect from the site, the easy answer is to take a passive shield tanked ship. Aiming for a tank that does not rely on the capacitor at all is the simplest way to run these sites. Ships that work well for this are the Gila and the Drake, but its possible to get acceptable tanks on other hulls as well. These fits are going to have Large Shield Extenders, passive resistance amplifiers, shield power relays, and Core Defence Field Purgers. Below is a sample Drake fit, which I have not had an opportunity to test.
If an active tank is what you want, you need to give careful consideration to the amount of energy neutralizing pressure the Sleepers can bring to the table. This Reddit post details the possible range of spawns and the amount of neutralizing that can be expected from each ship. Doing some quick math shows that the maximum pressure you can expect is 43GJ/s. This means that if you have modules you need to remain active, like an Armor Repairer, the ship you are flying needs to have at least +43GJ/s of capacitor regen on top of what you need to keep the mods running. To take a look at this, let’s discuss the Legion.
Backstory
Prior to the T3C changes in July, I had a Legion I used as an anti-support ship while doing fleet work. Once the changes hit, this ship was taken out of service. I experimented with some possible uses for the hull, but never hit on anything satisfactory. With the announcement of the Warzone event, along with the details that were quickly revealed about the sort of resistance we could expect, I decided it was time to dust off the Legion.
Technical Details
The Legion is the Amarr Tech 3 Cruiser. Tech 3 Cruisers do not have many bonuses native to the hull. First is a 99% reduction in CPU requirements for all Scan Probe Launchers. Second is the ability to remove rigs without them being destroyed. Most of the bonuses and customization these hulls possess comes from there subsystems.
Subsystems (4):
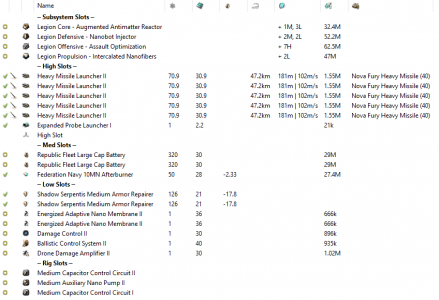
–Legion Core – Augmented Antimatter Reactor (+1 Mid, +3 Low): The Core subsystem I chose provides nice bonuses for increasing the capacitor. For each level of the Core skill, the subsystem provides 5% to capacitor capacity and 3% to energy warfare resistance. The subsystem also provides a 20% bonus to power grid, +50GJ to capacitor capacity, and some additional base stats.
–Legion Defensive – Nanobot Injector (+2 Mid, +2 Low): The Nanobot Injector subsystem provides the backbone for the active tank needed to run a site. For each level of the Defensive Skill, the subsystem provides 10% to the effectiveness of Armor Repairers as well as 10% to the benefits derived from overheating them. Additionally, the subsystem provides 100 Shield HP, 500 Armor HP and 300GJ of additional capacitor and some additional base stats.
–Legion Offensive – Assault Optimization (+7 High, +5 Launchers, +50mbit Drone Bandwidth, +200m3 Drone Bay): The choice of this offensive subsystem is to provide weapons that dont use capacitor. For each level of the Offensive skill, the subsystem provides 5% to the damage and rate of fire for Rapid Light, Heavy Assault, and Heavy Missiles. A 10% bonus per level to Drone hitpoints and damage is also provided. Additionally, the subsystem provides +200MW of powergrid, +150tf of CPU, along with a 25% reduction in the CPU and Powergrid cost of fitting Rapid Light, Heavy Assault, and Heavy Missile Launchers.
–Legion Propulsion – Interlaced Nanofibers (+2 Low): I chose this system for the slot layout more than the bonuses it provides, but they are still beneficial. For each level of the Propulsion skill, the subsystem provides a 5% bonus to both ship agility and max velocity. This subsystem only provides some additional base stats outside of the skill bonuses.
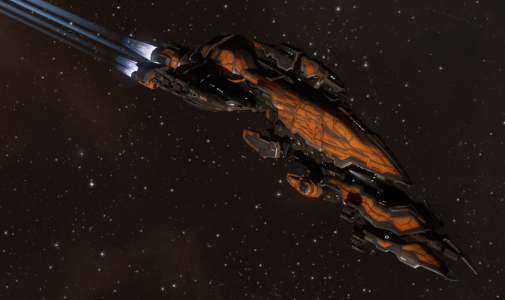
Subsystems also change the look of the ship. When configured like mine, it looks like this. Sunburst SKIN optional.
High Slots (7, Five Launcher Hardpoints): To keep with the capless weapons, I selected Heavy Missile Launcher IIs for the five launcher hardpoints. I chose these over Heavy Assault Missiles as some of the Sleepers tend to pull a great distance away during an engagement and the limited range of HAMs would be a detriment. Also given the majority of the Sleeper’s hitpoints are going to be concentrated in the larger ships, the more consistent damage of the Heavy Missiles would be more desirable than the burst provided by Rapid Lights. Given it is very cheap to do so, I fit an Expanded Probe Launcher in one of the utility high slots. The other is left empty due to fitting requirements.
Mid Slots (3): The mid slots are devoted to on-grid mobility and cap stability. The first slot is occupied with a Federation Navy 10mn Afterburner. I’ve chosen to use a faction variant here as the draw on the capacitor is lower than its T2 counterpart. The second and third slot are both taken up by Republic Fleet Large Cap Batteries. These provide an additional 1820GJ to the capacitor, which both provides a buffer against the neutralizing pressure and also increases the natural regeneration of the capacitor.
Low Slots (7): The low slots are devoted mostly to tank. We begin with a pair of Shadow Serpentis Medium Armor Repairers. These are chosen over there T2 counterpart for the reduction in powergrid needed for them. Next, the resistance profile is formed by two Energized Adaptive Nano Membrane IIs and a Damage Control II. Since Sleepers deal damage equal across all four types, there is no need to patch a dedicated hole. The last two slots are occupied by damage mods, one Ballistic Control System and one Drone Damage Amplifier. I selected this setup for two reasons. First, the Drones are going to be a much better weapon for killing the smaller ships, so an increase in damage makes sense there even tho the missiles deal more damage when loaded with Fury type ammo. Second, the fit does not have the CPU without implants to accommodate two Ballistic Control Systems and I wanted to keep this fit free of any implant requirements.
Rigs (3): The first rig slot is dedicated to improving the Armor Reppers with a Medium Auxilliary Nano Pump II. The second and third slot help improve the natural regeneration rate of the capacitor with a pair of Medium Capacitor Control Circuits. A Tech 2 and a Tech 1 are used as the fit does not have the calibration to make all the rigs T2.
Drones (50mbit bandwidth, 200m3): For drones, I opted for the following. Given they deal massive damage compared with the alternatives, I grabbed ten Hammerhead II’s. It’s important to carry spares as Sleepers can get very aggressive against Drones. I also pack two flights of Light Drones, represented here as Warrior II’s. These are mainly for PvP encounters if I am unlucky enough to have one. Also in that though is the flight of Vespa EC-600’s that round out my drone bay. A little more powerful and durable than the EC-300, they would serve as a last-ditch escape mechanism.
Bling: There are a couple places where some bling would make the ship more capable. First up is the damage mods. Making the Ballistic Control System faction means you have the CPU to change to DDA to a second faction BCS. This will improve the performance of the Heavy Missiles against large targets, at the cost of some drone damage against smaller ones. Additional CPU room can be made available by making the EANMs faction as well.
Implants: I’ve tried to keep this fit implant free, but if you wish to augment its capabilities I would recommend the following setup. Slots 1-6 X-Grade Asklepian Set, Slot 7 HM-70X, Slot 8 EM-80X, Slot 9 TN-90X, Slot 10 RL-100X.
Use Case
This fit was created to run the Warzone sites. As such and being an active tanked ship, its necessary to have a margin of stability of the capacitor of at least +43GJ/s on top of the module needs. At All V, this fit has a +60.6GJ/s margin after module needs, plenty of buffer to run the site. At Subsystems IV, which is what I have, the margin is +59.6GJ/s, still plenty of room.
The Warzone sites are run quite simply. Once one is located on your overview via a Celestial Beacon, warp to the site. Make sure your Armor Reppers are turned on at this point. You will land on an acceleration gate with a Quartermaster ship nearby. Activating the gate will take you into the only room of the site. This room contains an acceleration gate to take you back to the start point, along with five Drifter wrecks and a wrecked station. These show up as Large Collidable Objects. Approach each wreck with your prop mod on until you make physical contact with it. On making contact, one of three things will happen. First is nothing, proceed to the next wreck. Second is that a cargo container will spawn either at the wreck you hit or the station. This contains the Corrupted Trinary Relic that the Quartermaster is asking for. The third is that a Sleeper spawn will occur. This can range from six ships up to eleven ships, but in my experience, it’s around 7-8. If ships spawn, focus on killing the Wardens first as they are the logi. After the Wardens are dead, kill the Frigates and then work your way up to the Battleships. Make sure the scoop the loot that any of the wrecks produce. In addition to standard blue loot as found in wormholes, the Sleepers can drop the Agency Boosters and a Valkyrie Cerebral Accelerator can appear in the wrecks. Sometimes the second and third event can happen at the same time. On bumping into the last wreck and dealing with any spawns, take the acceleration gate back to the Quartermaster and give him the Corrupted Trinary Relic you got from the container by dragging it into his cargo bay to despawn the site.
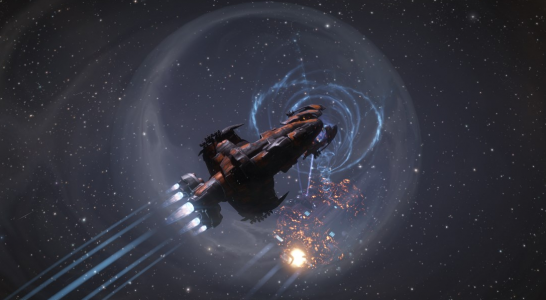
The Legion takes down an Eosian Safeguard
I’ve successfully used the Legion to clear multiple of these sites and kill enough Sleepers to get the 20 point Agency Mission completed in a reasonable amount to time each day. The fit handles well, possessing a good combination of durability and offensive capability. Don’t be afraid to recall your drones if they start taking aggro and you can keep them alive without losses. I’ve never felt enough pressure on ether tank or capacitor to feel the ship was at risk.
I hope you enjoyed this quick primer for The Warzone sites and a more in-depth review of a Legion capable of running them. I hope all of you are finding success in the Warzone event and that lots of ships are being tried out. Give me a shout in the comments with what you are using to run the sites. Until next time.