Welcome to another issue of The Drafting Table. This time we take out one of the Caldari Navy’s finest, the Scorpion Navy Issue.
Backstory
For a Secret Santa in 2016, I was given a Scorpion Navy hull by a corpmate. I fit it up and then it just ended up sitting there. I decided enough was enough and took the old girl out for a roam.
Technical Details
The Scorpion Navy Issue (SNI) is a Caldari faction battleship which is built to take a pounding and dish it right back. The Navy version swaps the ECM bonuses of the standard Scorpion hull for shield resist and missile rate of fire. Each level of Caldari Battleship grants the Scorpion Navy 4% to all shield resistances and 5% to the rate of fire of all Rapid Heavy Missile, Cruise Missile, and Torpedo Launchers.
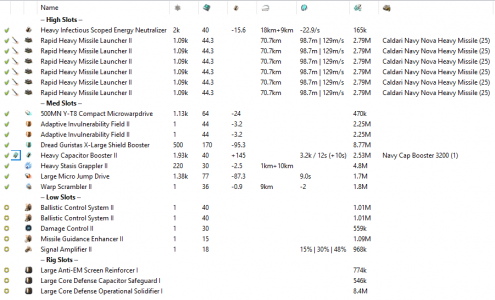
High Slots (7, Four Turret Hardpoints, Six Launcher Hardpoints): With a bonus to launcher rate of fire, the fact that the SNI has turret hardpoints at all should be ignored. Without an application bonus, Torpedos are not something I would put on this ship. While they deal massive damage, in a solo or small gang environment how well that paper damage applies needs to be considered as well. Torpedos do not apply damage well unassisted. This leaves a choice between Rapid Heavy Missile Launchers or Cruise Missiles. I made the call to go with Rapid Heavies, as the burst damage they provide along with good application gave me the best shot at taking down small targets fast. Since those normally have scrams and other bits of nastiness, I give that priority. I filled the remaining high slot with a Heavy Infectious Scoped Energy Neutralizer to allow for some cap warfare against active tanked or fast targets.
Mid Slots (8): With a huge rack of mid slots, the SNI can take huge advantage of its shield resist bonus and pack a nasty tank. I chose to go with an active tank, formed from a Dread Guristas XL Shield Booster. The faction XLSBs are quite affordable and offer an improvement on the T2 version. Two Adaptive Invulnerability Fields buttress the resist profile, increasing the effectiveness of the restored shield HP from the booster. To sustain this tank and other active modules as long as possible, a Heavy Capacitor Booster II loaded with a Navy 3200 charge is used to quickly replenish a healthy reserve. For on-grid maneuverability both a Micro Jump Drive and a 500MN Y-T8 Compact Microwarpdrive are fit, the former for escape and striking from a distance, the latter for moving around once in place to fight. The final two slots are to ensure the target will not leave once captured; the ubiquitous Warp Scrambler II and a Heavy Stasis Grappler II.
Low Slots (5): The first low slot helps to further enhance the resistance profile with a Damage Control II. Next comes two Ballistic Control System IIs, which though rate of fire and damage increases make the heavy missiles more deadly. Fourth is a Missile Guidance Enhancer II, which makes the heavy missiles apply damage better to smaller and faster targets, while also boosting their range. Last is a Signal Amplifier II. With this mod, I hoped to improve on two common issues of solo battleships, slow locktimes, and vulnerability to ECM.
Rigs (3): All three of the rig slots went to bolstering the tank. First, the only hole in the resistance profile is patched with a Large Anti-EM Screen Reinforcer I. Second is a Large Core Defence Operational Solidifier, which reduces the cycle time of shield boosters, allowing for more HP to be restored in a given period of time. Last is a Large Core Defence Capacitor Safeguard, which reduces the capacitor needs of the shield booster. This effectively nullifies the increased draw on the capacitor from the LCDOS rig, making sure that the SNI’s capacitor is not stressed to heavily.
Drones (75m3, 75mbit bandwidth): The SNI has a respectable drone bay, and I took the opportunity to pack as many light drones as I could to help deal with small fast ships. I used Acolyte IIs for this task.
Bling: There are a couple places I would start when adding some bling to this fit. First is the shield booster. Any of the Deadspace Gist type XLSBs are a drop in upgrade and provide a large increase in the tank as well as far less capacitor draw. Upgrading the rigs to the Tech II variants is very reasonably priced. The Signal Amplifier would also be good, as it helps improve both lock time and resistance to ECM. Next I would look into upgrading the tackle mods and the heavy neut, as improvements here are going to help keep targets where you want them.
Implants: This fit would benefit a lot from a good implant set. I would recommend the following. Slots 1-6 X-Grade Crystals, Slot 7 SA-70X, Slot 8 GP-80X, Slot 9 TN-90X, Slot 10 RL-100X. This set improves the capabilities of the shield booster, the application, and rate of fire of the missiles, and provides a boost to the lock time of hostile ships.

Its possible to go overboard with bling here. Please PLEX responsibly.
Use Case and Testing
Since this was a hull provided to me as a gift, I wanted to make sure I had fun flying it and had a good story to tell afterward. I managed this, tho not in a timely manner.
The first and final voyage of this ship began in 1DQ, its home for the last 14 months. From there I set a course for Kebers. I keep a small stash of ships there due to its proximity to both Delve and Catch/Providence as well as its ease of resupply. On arrival, it was my intent to leave the ship with the rest of the stash and then self-destruct home. On thinking about it, I decided it was time for this ship to be bloodied. One warp to the HED-GP gate later and I jumped off on an adventure.
To my disappointment, HED-GP was quite devoid of anything capable of offering a fight. A single Atron sat over 300km off the gate with a bubble in line to SV5-8N. Heading out of the system, I derped up and warped directly to the SV5 gate and got caught in an anchored bubble. I took a moment to clear the navigation hazard before moving on, destination Providence. I headed for the PI5-39 pocket, just to see what would happen. I quickly picked up a shadow on my arrival, and when I turned to leave the pocket there was a small fleet waiting for me. Formed around a single Megathron battleship with a Ferox, Onyx, Blackbird and a couple frigates in support, it looked like this was going to be the fight I got. The only disappointment was the Blackbird.
ecm.jpg
However, the locals had forgotten one thing. I decloaked and began aligning to my planned outgate. I was quickly target painted and unsuccessfully jamed before I was pointing where I wanted to go. One quick MJD hop later and I was on my way, nobody had thought to scram me. I continued my flight back to Catch, but had several shadows including a Scorpion and a Tempest. Jumping into F9E-KX, I was joined by a Malediction. Faced with the likelihood of a scram, it was gotime. I decloaked and aligned to SV5-8N. The Malediction followed suit and long pointed me. Game On.
Quick on the heels of the Malediction was the Scorpion. This was my primary target, as the jams presented the largest obstacle to me coming out ahead of this engagement. While I was sure my tank could hold up, I knew there was a Tempest on its way and I needed to be free of ECM before engaging it. The Scorpion’s shields collapsed quickly and I started eating into armor before I hit my first reload cycle. It was then I discovered that this Scorpion was active armor tanked. Before my missiles reloaded, the Tempest accompanied by a Jackdaw jumped in and joined the fight. The Tempest had a scram, so I was now pinned to the grid. My tank was still holding under the barrage of missiles and projectile rounds, but just barely. Then the first jam landed.

From Spaceballs
At this point the terms of the fight became clear. I had to kill the Scorpion. On doing that, the Tempest would be easy to handle. Nether light ship had shown themselves to have a scram, so after that, I could de-agress, MJD and jump out to SV5. If I could not kill the Scorpion due to his jams keeping me from locking him, I could hold as long as my Navy 3200s allowed. While not entirely locking me out, the Scorpion did manage to keep me jamed often enough to where the last Navy 3200 flooded my capacitor and I had until that charge ran out to finish things. At this point, the clear victory of the Provi guys was interrupted by the appearance of an NC. Jackdaw roam. They came from D-GTMI and quickly set to work interrupting the end of the fight. Myself and the Provi Tempest were able to MJD out of the bubble. The Scorpion did not have an MJD or enough jams for all the Jackdaws and died. I managed to warp out to the SV5 gate from where the MJD deposited me, but in warp realized just how bad the situation was. My capacitor was bone dry and I had no more Navy 3200 charges. Without the cap to keep my Adaptive Invulnerability Fields on, let alone run my shield booster, and only having about 40% hull points remaining it was pointless to run. I held on the SV5 gate where the NC. Jackdaws put an end to the Scorpion Navy Issue. I declined to jump as it would have removed the contributions of the Provi guys to my death.
Changes After Testing
I’m actually really happy with how this fit performed. Were I to have to re-fight the specific engagement, I would probably choose Cruise Missiles over the Rapid Heavies. The 35s reload cycle hurt my chances of killing the Scorpion and while I’m not sure it would have made a big enough difference to change the outcome of the battle it’s an interesting thought. Using Cruise Missiles would require some reworking due to their greater fitting requirements, so I’m happy to leave the fit with Rapid Heavies.
I hope you enjoyed my adventure in one of the Caldari State’s finest warships. The Scorpion hull is fantastic and with the more combat oriented nature of the Navy Issue over its standard counterpart providing a much different play experience than one can have with the standard version. I challenge you to take one of your hanger queens out for a roam. While you might part ways with the ship, sometimes flying something neglected is a nice shot in the arm. Until next time.


