In the quest for more speed, we take a look at another variant of the Phantasm, this time with a much bigger afterburner.
Backstory
While toying around with the fit I previously explored here, one of my corpmates commented: “I like the 100mn versions better”. Despite my dislike of overproped ships, mostly due to liking the flexibility to turn, I decided to fork the fit I was working on into a 100mn variant as well. It would at least have value as a comical lossmail, if nothing else.
Technical Details
To recap what makes the Phantasm tick, the below is reproduced from the 10mn issue.
The Phantasm is a cruiser belonging to the Sansha’s Nation pirate faction. Like other pirate ships, they draw bonuses from two racial skills as well as having a bonus built into the hull itself. From the hull bonus, the Phantasm receives a 150% bonus to Medium Energy Turret damage. The Amarr cruiser skill lends a 7.5% bonus to the tracking speed of Medium Energy Turrets, which helps them apply that bonused damage better. The interesting bonus comes from the Caldari Cruiser skill; 20% bonus to Afterburner velocity bonus per level. This means at Caldari Cruiser five, afterburners equipped on a Phantasm are twice as effective.
What makes this specific version of the ship work is that the afterburner bonus. Over-propped ships are already quite fast and the Phantasm’s bonus helps boost unscramable speed to great heights. This comes at the expense of being able to turn.
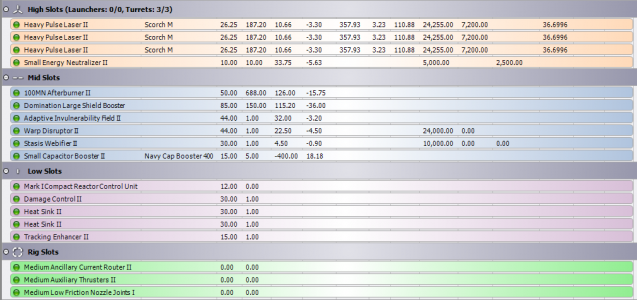
High Slots (4, Three Turret Hardpoints): Like my previous outing in the ship, the weapon of choice is the trusty Heavy Pulse Laser II. Here the fitting room over Beam turrets is even more helpful. The last slot is occupied with a Small Energy Neutralizer II, to provide a little bit of cap warfare against close targets.
Mid Slots (6): The first four Mid slots are identical to the 10mn version. First is the tank, composed of a Domination Large Shield Booster and an Adaptive Invulnerability Field II. Next is the tackle mods, a Warp Disruptor II and a Stasis Webifier II. Even after determining that the 10mn version would play better with a scram, I hung onto the Warp Disruptor here as this version is much faster and therefor on paper should not run into the same issue of getting outrun. The change from the 10mn fit comes in two places. First is the capacitor booster is swapped to a Small Capacitor Booster II. This is due to fitting requirements, as the additional power-grid is badly needed for the final mid slot. Replacing the faction 10mn Afterburner is the 100mn Afterburner II. Providing a massive boost to speed, this oversized unit allows for the Phantasm to outrun some microwarpdrive fit cruisers in a straight line.
Low Slots (5): The low slots are much the same as the 10mn version with one notable exception. The tank is rounded out with a Damage Control II. DPS is improved with a pair of Heat Sink IIs. Application and range of the Heavy Pulse Laser IIs are augmented by a Tracking Enhancer II. Replacing the Overdrive Injector II from the 10mn fit is a Mark I Compact Reactor Control Unit. This provides a necessary boost the power-grid available, all of which is taken up by the 100mn Afterburner.
Rigs (3): The rigs help accommodate the massive prop mod as well as improve the speed and handling of the ship. First is a Medium Ancillary Current Router II, which provides the remaining powergrid needed for the prop mod. Second is the Medium Auxiliary Thrusters II, which provide a nice boost to our already fast top speed. The last slot is occupied by a Medium Low Friction Nozzle Joints I, which helps improve the ship’s agility.
Drones (15 m3, 15 Mbit Bandwidth): As before, I went with a triplet for Warrior II’s to provide some diversity of damage type.
Bling: If you have the money to throw around, there are a couple places that bling helps really improve this fit. First is the Afterburner. Several Faction variants and the Core deadspace line all fit, with the bonus to speed going even farther. Upgrading the Shield Booster to an improved faction variant or Gist line helps improve the tank.
Implants: As before, the Snake set with its bonus to speed would be a great benefit to this fit, as would the other speed boosting implants. I would choose these over a tank improving set as once you get up to speed, it will be far more difficult to hit you.
Use Case
Unlike the 10mn version, I intended to fly this fit in a more kitey manner. Burn away from the target and engage at range. Use the excellent application of my guns to burn down small ships that try and close the range with minimal transversal. A sound plan on paper, seeing as being on the other side has gotten me killed before.
In practice, it didn’t work that well. My only engagement with this ship was a short affair marred by bad piloting. Seeing a single Drake on D-Scan, I decided to warp to where he likely was, intending to land at a perch. Instead, I was pulled into a bubble and exited warp about 5km from the Drake. I lit my AB off and started burning away. The Drake was able to lock me up and get his web on me before I got outside of 10km from him. I continued to try and pull range but was not able to keep all of my active stuff going with just the small cap booster. When his friend showed up, I just melted.
Before discussing the issue with the fit that helped hasten my demise, it’s important to also talk about how over-propped ships normally fly. While quite fast in a straight line, over-propped ships are both more difficult to turn and accelerate slower than ships equipped with an appropriately sized mod. The practical effect this has in a combat scenario is that webs are something you really need to watch out for. Since I was webbed, my practical top speed was reduced but the amount of time it takes the ship to accelerate to that speed was still influenced in a negative way by the prop mod. Due to this, I was not able to pull the range necessary to get up to speed, either to kite or escape.
Changes After Testing
My piloting errors forced to the forefront a flaw in the fit I had hoped to mitigate by having a fast, at-range engagement. As mentioned I was not able to run all of my active modules, such as my Afterburner and guns, as I ran out of cap. The Small Capacitor Booster can only hold up to 400GJ charges, and a single one at that. Given the reload time and stress on the capacitor, that 400GJ injection every 22 seconds was not enough. The fix for this is to use larger cap booster charges, such as the 800. The additional amount inputted into the capacitor does help keep modules active.
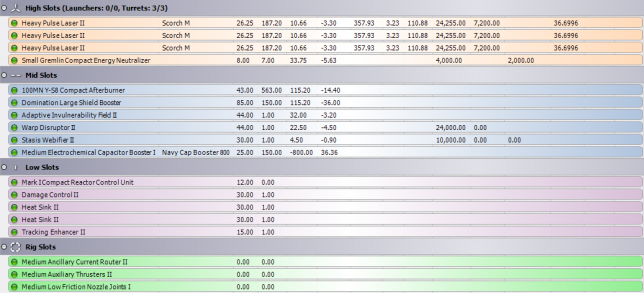
In order to do this, the fit requires a Medium Capacitor Booster. Swapping a 100mn Y-S8 Compact Afterburner for the T2 version provides enough CPU and Powergrid to make this happen, with some wiggle room provided by implants. If you are not using any 6-slot implant, you can make a Medium Electrochemical Capacitor Booster fit by using an EC-601 implant and downgrading the Small Energy Neutralizer II to the Compact variant. If you need to 6-slot, or otherwise do not want to use implants, you can use a Medium ‘Gattotte’ Capacitor Booster. This gives the ability to inject double the capacitor per cycle, which could prove to be the difference between successfully escaping at top speed or dying without any active modules functioning.
Kiting has always been something that is difficult for me and running this Phantasm did not really help me get better at it. I would recommend this if you already enjoy a variety of kiting ships. If you are not a huge fan of kiting, 10mn Phantasms may serve you better. Got any questions or comments on the fit or my complete lack of kiting ability? Shout out in the comments. Until next time.