Table of Contents
Mining Lasers and Strip Miners
The first distinction to be made is between mining lasers vs strip miners. Mining lasers are only used on mining frigates or on other ships that are not bonused for mining. Any mining barge or exhumer cannot use mining lasers as they require a turret hardpoint in order to be equipped.
The upside of this is that they are replaced by something even better – strip miners. Strip miners come in a few different varieties. You have your run-of-the-mill Strip Miner I’s, which require training Mining IV to use, but Mining is a 1x skill, so it is a fast train. Strip Miners are only usable on Mining Barges and Exhumers – and they mine a great deal more than mining lasers.
There are two T2 versions of Strip Miner I’s – the Modulated Strip Miner II and the Modulated Deep Core Strip Miner II. The Modulated Strip Miner II is the direct upgrade to the Strip Miner I – and to use it you need the additional 4-day train to Mining V. However, in order to properly use it, you need to train mining crystals.
Yield Table
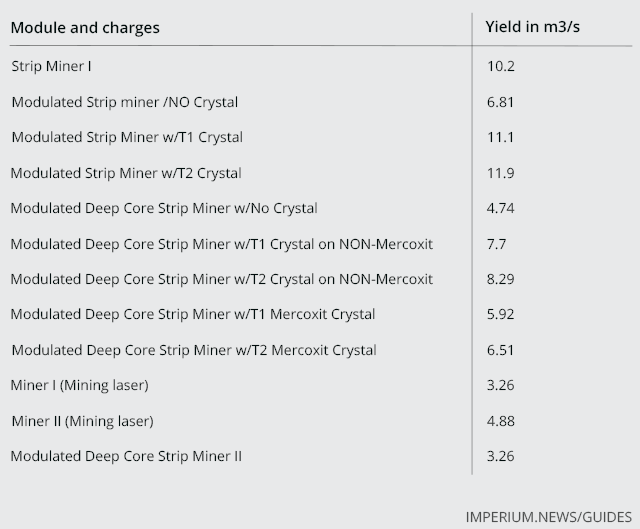
(These numbers were arrived at by use of Pyfa (a tool with which you can test ship fittings) and fitting the strip miner type modules on a Hulk with nothing else fit. The mining lasers were fit on a Prospect – also with nothing else fit. The m³/s as given by Pyfa was recorded with the “All 5 skill” option)
There are quite a few conclusions one can draw from the above chart:
- Strip miners are a significant upgrade from mining lasers (Strip Miner I’s more than double the yield of Miner II’s).
- Not using a mining crystal with either T2 strip miner is a significant loss of yield.
- Mining Mercoxit and then forgetting to re-equip your Modulated Strip Miners (MSMs) even though you switch crystals results in a significant loss of yield (8.29m3/s for T2 crystals on a non-Mercoxit ore with the correct crystals using a Modulated Deep Core Strip Miner (MDCSM) vs 11.9m3/s with the proper MSM and T2 crystals).
- Even with the proper T2 crystals – mining Mercoxit has a much-reduced m3/s. Unfortunately one can only mine Mercoxit with an MDCSM or a Modulated Deep Core Mining Laser. Thus the m3 yield one gets for Mercoxit will always be lower than regular ores. On a unit-by-unit basis, Mercoxit is the most valuable ore in the game, but given that it is also the most voluminous (It has the most m3 per unit) it takes both a long time to mine and mines in smaller amounts at one time than other ores. Because of this one should consider that Mercoxit may not be the best isk/hour in mining – a careful calculation based on your skills is needed to determine whether it is more profitable to mine than other ores or not.
Mining Crystals
Mining crystals such as Spodumain Mining Crystal II equipped in a Modulated Strip Miner II can increase your mining from a Strip Miner I by 16.67% on Spodumain. One of the things to note about mining crystals is that they are specific to the ore they are named after.
The flip side to the increase in mining yield provided by mining crystals is the time it takes to train to use them. Each different type of mining crystal requires training the processing skill for the ore it is associated with – Spodumain Mining Crystal I requires Spodumain Processing III, while the Spodumain Mining Crystal II requires Spodumain Processing IV – this can add up to a significant amount of training time if one wishes to use a great many different sorts of mining crystals. This said – anyone serious about max yield mining will eventually end up training the T2 mining crystals for the ores they mine.

Max Tank vs Yield
One problem most miners have wrestled with is the issue of balancing tank and yield. When max yield fits tank considerably less than even moderately tanked ones, along with the delight some people get out of hunting and ganking miners – how much tank you need vs how much yield you are willing to sacrifice is an important question. The answer is, as usual, dependent on the situation and how much risk one is willing to take.
Highsec
If you are mining in highsec – you need to be prepared to sacrifice a great deal of yield for tank in order to survive a ganker rich environment. The following two fits are recommended to discourage solo gankers (even those multi-boxing multiple DPS ships for ganking) – they are unlikely to kill them. (Though, if you piss them off, people will go to extraordinary lengths to gank you).
[Procurer, Procurer EHP]
[Skiff, Skiff EHP]
Nullsec
If you wish to use a tanky fit in nullsec – see the above highsec tanky fit. It is that sort of fit which is wonderfully multi-purpose. In nullsec, you have a reasonable option of skipping the tank-driven fits of highsec for max yield fits.
Please note: Nullsec is a different animal than highsec. Highsec is generally crowded with a lot of players who are unknown to you. The danger in highsec is the unknown intention of this multitude. In nullsec – any reasonably sized alliance should have a decent ability to safeguard its space. In the Imperium – intel channels, defense fleets, standing fleets for mutual protection, and utilization of comms helps improve safety and the general situational awareness that allows reasonably safe usage of max yield mining ships.
If you decide to go max yield, you sacrifice a great deal of tank. Should you get caught out – for whatever reason (inattention, wormhole spawning, etc) you will likely die. Max yield miners weigh the cost of a ship or a fleet of ships against the long-term increase in yield, as well as their ability to react to hostile threats. They also consider their ability to kill rats in the areas in which they mine – nullsec rats are considerably harder to kill and defend against, but nullsec miners are also generally working with the people they are mining beside, so cooperation in the defense against and killing rats is far more likely to occur.
This being said – here are some max yield fits for use in nullsec:
[Covetor, INN MINING GUIDE MAX YIELD COVETOR]
[Hulk, INN MINING GUIDE HULK MAX YIELD]
Please note – the EHP on the hulk is around 16.8k with all skills to V, there is not actually enough CPU to have much wiggle-room in the fitting. If one wished, there is some that can be done with expensive fits, though the EHP increase is generally not considered worth the increased price tag.
[Hulk, INN MINING GUIDE HULK MAX YIELD BLING FIT]
This fit costs over a billion isk – compared to the 300m or so of the previous hulk fit. The EHP is 27.5k – an increase of around 11k EHP for more than triple the cost. This example is given to illustrate how bad the fitting and tank on a Hulk is, it is not recommended the reader use the bling fit.
For those who desire max AFK instead of max yield – the following fits will be of interest:
[Retriever, INN MINING GUIDE RETRIEVER AFK]
[Mackinaw, INN MINING GUIDE MACKINAW AFK]
These fits are for the mining barge/exhumer that is bonused for ore hold size. They are built on a basis of max yield but without the bonuses of the Covetor/Hulk so they mine a bit less. However it takes much longer to fill their holds, so offer the greatest time between having to deal with ore holds of all the mining barges/exhumers. Please note that since the ore hold is a specialized hold – expanded cargo holds will not increase its size.
Ice Mining
The above fits will generally work for ice mining – one simply trades out the strip miners for Ice Harvesters and the Mining Laser Upgrades for Ice Harvester Upgrades. This means you can use the same ships for ore mining that you use for ice mining – though having a separate ship is not a completely bad idea – being able to jump clone to the correct system with the ice belts and have the ships already there is excellent – traveling through space in mining ships is generally a bit harrowing. If one has a dedicated ice mining ship – one should consider replacing one of the Medium Core Defense Field Extenders with the Medium Ice Harvester Accelerator I – you may need to add a fitting rig in order to fit everything properly.
Fitting Notes
- These fits are done with All V skills – if your skills/fitting skills make it so these fits do not work for you – we recommend replacing a rig with a fitting rig as needed – otherwise, replace one of the low slots with a Damage Control Unit I or II
- For the max yield ships – you can generally fit a Supplemental EM Ward Amplifier in a mid slot given fitting skills – though this module is a bit expensive. If one lives in a region of space with heavy EM damage or wishes to increase tank without going full bling fit, this is a reasonable option for increased EM resistance.
- Mercoxit mining fits are the same as these, but with Modulated Deep Core Strip Miners.
Skill Plans
When training into subcap mining – it is important to train not just the skills for the hull itself, but also skills for the mining modules, tank, and defense. This is a general but robust skill plan for training into Exhumers as well as having the skills to use the appropriate tank and drones for defense.
If you only want to mine Mercoxit in a Procurer – here is a skill plan for you:

Rorqual fittings and plans are covered in elsewhere in the guide.
Next up: Survival